

Featured Image: Best Reviews
When it comes to making clean, straight cuts, electric metal shears are a must-have item in your toolkit. Because there are so many electric metal shears on the market nowadays, you may be confused about which one to purchase. Allow us to guide you on the proper path, beginning with our suggestions for the finest metal shears available.
Below are the top seven best sheet metal shears in the market today.
.fusion-fullwidth.fusion-builder-row-1 { overflow:visible; }1.>
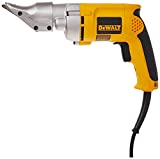
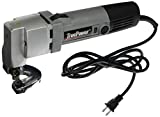
DEWALT Metal Shear, Swivel Head, 18GA (DW890) , Yellow The metal shear has powerful, 5 amp, all ball bearing motor for long lifeThe electric metal shear head swivels 360 degree for cutting convenienceThe electric metal shear cuts 7/32-inch strip, which continuously curls out of cutting area for clear line of sightVariable speed dial allows user to vary speed for specific materials and various applications (100-350 spm)Cuts radius of 5-1/2-inch and largerCheck Price Below
Buy on Amazon>
2.>Sale
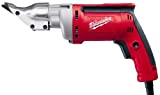
Milwaukee 6852-20 18-Gauge Shear Mpn: 6852-20Country of manufacture: ChinaManufacturer: Milwaukee6.8 amp Milwaukee motorHex WrenchCheck Price Below
Buy on Amazon>
3.>
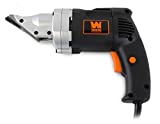
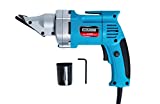
WEN 3650 4.0-Amp Corded Variable Speed Swivel Head Electric Metal Cutter Shear Pressure sensitive trigger cuts anywhere from 0 to 2500 strokes per minuteAttack up to 20 gauge stainless steel and 18 gauge sheet metalLightweight design limits fatigue during operationUtilizes a powerful 4-amp motor, curling the metal as it cutsSwiveling head rotates a full 360 degrees to meet the needs of any projectCheck Price Below
Buy on Amazon>
4.>Sale
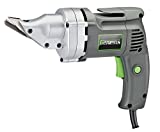
Genesis GES40 4.0 Amp Corded Swivel Head Variable Speed Electric Power Metal Shear, original version Quickly cuts metal roofing, flashing, and other sheet metal up to 14 gauge – Compare the Genesis metal shear to other drill attachment Shears that can only cut 20 gauge Sheet metal!Powerful 4.0 amp motor360° swiveling head for cutting control and convenience -cut circles and curves with the Genesis electric metal shearVariable speed (0-2500) SPM for versatility in cutting a variety of materials – cuts through sheet metal up to 14 gauge in thickness!Three blade cutting system reduces metal deformation – experience smooth cuts EVERYTIME!Check Price Below
Buy on Amazon>
5.>
Gino Development 01-0101 TruePower 18 Gauge Heavy Duty Electric Sheet Metal Shear Tin Snips Cutter Nibbler Country Of Origin: ChinaModel Number: 01-0101Item Package Dimension: 14.0″ L x 3.0″ W x 7.0″ HItem Package Weight: 6.0 lbCheck Price Below
Buy on Amazon>
6.>
Wild Edge Electric Metal Shear, 5.0 Amp Variable Speed Swivel Head 14 Gauge Electric Metal Shear Variable speed: (0-2700) strokes per minute in cutting a variety of materialsCuts up to 15 gauge stainless steel and 14 gauge sheet metalPowerful 5. 0 amp motor360 Degree swiveling head for cutting control and convenienceTwo finger trigger and lock-on buttonCheck Price Below
Buy on Amazon>
7.>
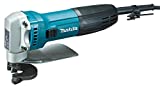
Makita JS1602 16 Gauge Shear Powerful 3.3 AMP motor delivers 4,000 SPM for the most demanding applicationsSmaller circumference barrel grip (only 2-1/4”) for added comfortRefined design at only 3.4 lbs. for increased controlLock-on slide switch for continuous operationBuilt-in thickness gauge for added convenienceCheck Price Below
Buy on Amazon>

1. DEWALT DW890 Metal Shear
.fusion-content-boxes-1 .heading .content-box-heading {color:#cfcfcf;}
.fusion-content-boxes-1 .fusion-content-box-hover .link-area-link-icon-hover .heading .content-box-heading,
.fusion-content-boxes-1 .fusion-content-box-hover .link-area-link-icon-hover .heading .heading-link .content-box-heading,
.fusion-content-boxes-1 .fusion-content-box-hover .link-area-box-hover .heading .content-box-heading,
.fusion-content-boxes-1 .fusion-content-box-hover .link-area-box-hover .heading .heading-link .content-box-heading,
.fusion-content-boxes-1 .fusion-content-box-hover .link-area-link-icon-hover.link-area-box .fusion-read-more,
.fusion-content-boxes-1 .fusion-content-box-hover .link-area-link-icon-hover.link-area-box .fusion-read-more::after,
.fusion-content-boxes-1 .fusion-content-box-hover .link-area-link-icon-hover.link-area-box .fusion-read-more::before,
.fusion-content-boxes-1 .fusion-content-box-hover .fusion-read-more:hover:after,
.fusion-content-boxes-1 .fusion-content-box-hover .fusion-read-more:hover:before,
.fusion-content-boxes-1 .fusion-content-box-hover .fusion-read-more:hover,
.fusion-content-boxes-1 .fusion-content-box-hover .link-area-box-hover.link-area-box .fusion-read-more,
.fusion-content-boxes-1 .fusion-content-box-hover .link-area-box-hover.link-area-box .fusion-read-more::after,
.fusion-content-boxes-1 .fusion-content-box-hover .link-area-box-hover.link-area-box .fusion-read-more::before,
.fusion-content-boxes-1 .fusion-content-box-hover .link-area-link-icon-hover .icon .circle-no,
.fusion-content-boxes-1 .heading .heading-link:hover .content-box-heading {
color: #65bc7b;
}
.fusion-content-boxes-1 .fusion-content-box-hover .link-area-box-hover .icon .circle-no {
color: #65bc7b !important;
}.fusion-content-boxes-1 .fusion-content-box-hover .link-area-box.link-area-box-hover .fusion-content-box-button {background: #293f63;color: #ffffff;}.fusion-content-boxes-1 .fusion-content-box-hover .link-area-box.link-area-box-hover .fusion-content-box-button .fusion-button-text {color: #ffffff;}
.fusion-content-boxes-1 .fusion-content-box-hover .link-area-link-icon-hover .heading .icon > span {
background-color: #65bc7b !important;
}
.fusion-content-boxes-1 .fusion-content-box-hover .link-area-box-hover .heading .icon > span {
border-color: #65bc7b !important;>
Pros:
AffordablePower lockWith a solid bearing based 5A motorVersatile speed
Cons:
Tough to work w/ when it comes to thick materials
Sebring Tip:
The DeWalt’s DW890 Metal Shears are a pair of double-sided electric shears. On the metal workpiece, they cut a thin 7/32-inch strip out of it. This strip curls as you cut, keeping it out of the way and allowing you to continue working without having to stop to remove the extra material every time you cut.
There are ball bearings in the 5-amp motor, which reduce friction and assist guarantee the motor’s long life and excellent quality. Also, the speed may be adjusted from 100 to 350 spm with the help of a handy dial. In addition to the 360° rotating head, the trigger may be kept in the on position to reduce user fatigue while cutting lengthy strips.
.fusion-content-boxes-1 .fusion-content-box-hover .heading-link:hover .icon i.circle-yes,
.fusion-content-boxes-1 .fusion-content-box-hover .link-area-box:hover .heading-link .icon i.circle-yes,
.fusion-content-boxes-1 .fusion-content-box-hover .link-area-link-icon-hover .heading .icon i.circle-yes,
.fusion-content-boxes-1 .fusion-content-box-hover .link-area-box-hover .heading .icon i.circle-yes {
background-color: #65bc7b !important;
border-color: #65bc7b !important;>

2. Milwaukee 6852-20 18-Gauge Shear
.fusion-content-boxes-2 .heading .content-box-heading {color:#cfcfcf;}
.fusion-content-boxes-2 .fusion-content-box-hover .link-area-link-icon-hover .heading .content-box-heading,
.fusion-content-boxes-2 .fusion-content-box-hover .link-area-link-icon-hover .heading .heading-link .content-box-heading,
.fusion-content-boxes-2 .fusion-content-box-hover .link-area-box-hover .heading .content-box-heading,
.fusion-content-boxes-2 .fusion-content-box-hover .link-area-box-hover .heading .heading-link .content-box-heading,
.fusion-content-boxes-2 .fusion-content-box-hover .link-area-link-icon-hover.link-area-box .fusion-read-more,
.fusion-content-boxes-2 .fusion-content-box-hover .link-area-link-icon-hover.link-area-box .fusion-read-more::after,
.fusion-content-boxes-2 .fusion-content-box-hover .link-area-link-icon-hover.link-area-box .fusion-read-more::before,
.fusion-content-boxes-2 .fusion-content-box-hover .fusion-read-more:hover:after,
.fusion-content-boxes-2 .fusion-content-box-hover .fusion-read-more:hover:before,
.fusion-content-boxes-2 .fusion-content-box-hover .fusion-read-more:hover,
.fusion-content-boxes-2 .fusion-content-box-hover .link-area-box-hover.link-area-box .fusion-read-more,
.fusion-content-boxes-2 .fusion-content-box-hover .link-area-box-hover.link-area-box .fusion-read-more::after,
.fusion-content-boxes-2 .fusion-content-box-hover .link-area-box-hover.link-area-box .fusion-read-more::before,
.fusion-content-boxes-2 .fusion-content-box-hover .link-area-link-icon-hover .icon .circle-no,
.fusion-content-boxes-2 .heading .heading-link:hover .content-box-heading {
color: #65bc7b;
}
.fusion-content-boxes-2 .fusion-content-box-hover .link-area-box-hover .icon .circle-no {
color: #65bc7b !important;
}.fusion-content-boxes-2 .fusion-content-box-hover .link-area-box.link-area-box-hover .fusion-content-box-button {background: #293f63;color: #ffffff;}.fusion-content-boxes-2 .fusion-content-box-hover .link-area-box.link-area-box-hover .fusion-content-box-button .fusion-button-text {color: #ffffff;}
.fusion-content-boxes-2 .fusion-content-box-hover .link-area-link-icon-hover .heading .icon > span {
background-color: #65bc7b !important;
}
.fusion-content-boxes-2 .fusion-content-box-hover .link-area-box-hover .heading .icon > span {
border-color: #65bc7b !important;>
Pros:
Powerful 6.8A motorTrigger that can be adjusted for speedDesign that is easy to transport
Cons:
ExpensiveCan have a hard time with corrugated sheet
Sebring Tip:
Milwaukee’s 6852-20 18-Gauge Shear is a high-end model. It features a 6.8 Amp motor that can cut 1/18-inch sheet steel or 1/20-inch stainless steel. The waste curl has a cutting power of up to 2,500 spm and measures 13/64 inches.
The variable speed, like the WEN, is regulated by how hard the trigger is squeezed. The head swivels up to 360 degrees, which is a common feature in these gadgets but should be regarded as a must-have. The gadget is a little over four pounds, owing in part to a magnesium gearbox, and it features a rubber, tactile grip that helps to minimize user fatigue and offer a pleasant experience.
.fusion-content-boxes-2 .fusion-content-box-hover .heading-link:hover .icon i.circle-yes,
.fusion-content-boxes-2 .fusion-content-box-hover .link-area-box:hover .heading-link .icon i.circle-yes,
.fusion-content-boxes-2 .fusion-content-box-hover .link-area-link-icon-hover .heading .icon i.circle-yes,
.fusion-content-boxes-2 .fusion-content-box-hover .link-area-box-hover .heading .icon i.circle-yes {
background-color: #65bc7b !important;
border-color: #65bc7b !important;>

3. WEN 3650 Electric Metal Cutter Shear
.fusion-content-boxes-3 .heading .content-box-heading {color:#cfcfcf;}
.fusion-content-boxes-3 .fusion-content-box-hover .link-area-link-icon-hover .heading .content-box-heading,
.fusion-content-boxes-3 .fusion-content-box-hover .link-area-link-icon-hover .heading .heading-link .content-box-heading,
.fusion-content-boxes-3 .fusion-content-box-hover .link-area-box-hover .heading .content-box-heading,
.fusion-content-boxes-3 .fusion-content-box-hover .link-area-box-hover .heading .heading-link .content-box-heading,
.fusion-content-boxes-3 .fusion-content-box-hover .link-area-link-icon-hover.link-area-box .fusion-read-more,
.fusion-content-boxes-3 .fusion-content-box-hover .link-area-link-icon-hover.link-area-box .fusion-read-more::after,
.fusion-content-boxes-3 .fusion-content-box-hover .link-area-link-icon-hover.link-area-box .fusion-read-more::before,
.fusion-content-boxes-3 .fusion-content-box-hover .fusion-read-more:hover:after,
.fusion-content-boxes-3 .fusion-content-box-hover .fusion-read-more:hover:before,
.fusion-content-boxes-3 .fusion-content-box-hover .fusion-read-more:hover,
.fusion-content-boxes-3 .fusion-content-box-hover .link-area-box-hover.link-area-box .fusion-read-more,
.fusion-content-boxes-3 .fusion-content-box-hover .link-area-box-hover.link-area-box .fusion-read-more::after,
.fusion-content-boxes-3 .fusion-content-box-hover .link-area-box-hover.link-area-box .fusion-read-more::before,
.fusion-content-boxes-3 .fusion-content-box-hover .link-area-link-icon-hover .icon .circle-no,
.fusion-content-boxes-3 .heading .heading-link:hover .content-box-heading {
color: #65bc7b;
}
.fusion-content-boxes-3 .fusion-content-box-hover .link-area-box-hover .icon .circle-no {
color: #65bc7b !important;
}.fusion-content-boxes-3 .fusion-content-box-hover .link-area-box.link-area-box-hover .fusion-content-box-button {background: #293f63;color: #ffffff;}.fusion-content-boxes-3 .fusion-content-box-hover .link-area-box.link-area-box-hover .fusion-content-box-button .fusion-button-text {color: #ffffff;}
.fusion-content-boxes-3 .fusion-content-box-hover .link-area-link-icon-hover .heading .icon > span {
background-color: #65bc7b !important;
}
.fusion-content-boxes-3 .fusion-content-box-hover .link-area-box-hover .heading .icon > span {
border-color: #65bc7b !important;>
Pros:
Low-costUp to 2,500 spm may be delivered via a pressure-sensitive triggerPower switch that can be locked on
Cons:
The motor is just 4 amps
Sebring Tip:
This model is a corded electric shear. It features a 4-amp motor that can go from 0 to 2,500 spm.
While other devices have a changeable dial, the WEN uses haptic pressure, which means that the harder you hold the trigger, the more power you receive, and the lighter you pull, the less power you get. Although it isn’t as precise as other methods, there is something to be said for the manual aspect of determining how much power you need. The WEN’s 4-amp motor isn’t quite as strong as the DeWalt’s, but it’s still one of the finest electrical metal shears for the money. It can cut stainless steel and sheet metal up to 20 gauge and 18 gauge. The twin blade design cuts 1.4-inch ribbon and weighs just 4.7 pounds, which means it is simple to hold and operate even over extended periods of time, reducing user fatigue.
.fusion-content-boxes-3 .fusion-content-box-hover .heading-link:hover .icon i.circle-yes,
.fusion-content-boxes-3 .fusion-content-box-hover .link-area-box:hover .heading-link .icon i.circle-yes,
.fusion-content-boxes-3 .fusion-content-box-hover .link-area-link-icon-hover .heading .icon i.circle-yes,
.fusion-content-boxes-3 .fusion-content-box-hover .link-area-box-hover .heading .icon i.circle-yes {
background-color: #65bc7b !important;
border-color: #65bc7b !important;>

4. Genesis GES40 Variable Speed Electric Power Metal Shear
.fusion-content-boxes-4 .heading .content-box-heading {color:#cfcfcf;}
.fusion-content-boxes-4 .fusion-content-box-hover .link-area-link-icon-hover .heading .content-box-heading,
.fusion-content-boxes-4 .fusion-content-box-hover .link-area-link-icon-hover .heading .heading-link .content-box-heading,
.fusion-content-boxes-4 .fusion-content-box-hover .link-area-box-hover .heading .content-box-heading,
.fusion-content-boxes-4 .fusion-content-box-hover .link-area-box-hover .heading .heading-link .content-box-heading,
.fusion-content-boxes-4 .fusion-content-box-hover .link-area-link-icon-hover.link-area-box .fusion-read-more,
.fusion-content-boxes-4 .fusion-content-box-hover .link-area-link-icon-hover.link-area-box .fusion-read-more::after,
.fusion-content-boxes-4 .fusion-content-box-hover .link-area-link-icon-hover.link-area-box .fusion-read-more::before,
.fusion-content-boxes-4 .fusion-content-box-hover .fusion-read-more:hover:after,
.fusion-content-boxes-4 .fusion-content-box-hover .fusion-read-more:hover:before,
.fusion-content-boxes-4 .fusion-content-box-hover .fusion-read-more:hover,
.fusion-content-boxes-4 .fusion-content-box-hover .link-area-box-hover.link-area-box .fusion-read-more,
.fusion-content-boxes-4 .fusion-content-box-hover .link-area-box-hover.link-area-box .fusion-read-more::after,
.fusion-content-boxes-4 .fusion-content-box-hover .link-area-box-hover.link-area-box .fusion-read-more::before,
.fusion-content-boxes-4 .fusion-content-box-hover .link-area-link-icon-hover .icon .circle-no,
.fusion-content-boxes-4 .heading .heading-link:hover .content-box-heading {
color: #65bc7b;
}
.fusion-content-boxes-4 .fusion-content-box-hover .link-area-box-hover .icon .circle-no {
color: #65bc7b !important;
}.fusion-content-boxes-4 .fusion-content-box-hover .link-area-box.link-area-box-hover .fusion-content-box-button {background: #293f63;color: #ffffff;}.fusion-content-boxes-4 .fusion-content-box-hover .link-area-box.link-area-box-hover .fusion-content-box-button .fusion-button-text {color: #ffffff;}
.fusion-content-boxes-4 .fusion-content-box-hover .link-area-link-icon-hover .heading .icon > span {
background-color: #65bc7b !important;
}
.fusion-content-boxes-4 .fusion-content-box-hover .link-area-box-hover .heading .icon > span {
border-color: #65bc7b !important;>
Pros:
Budget-friendlyMetal deformation is reduced because of three-blade systemSwitch that locks on
Cons:
Obstacles in the use of corrugated sheetBetter at doing straight lines than corners
Sebring Tip:
With a 4-amp motor, the Genesis GES40 Variable Speed Electric Power Metal Shear can cut sheet metal up to 14 gauge. It features variable speed settings ranging from 0 to 2,500 rpm, which are controlled by the sensitive trigger.
The Genesis weighs 5.4 pounds, which is a bit more than some other units, but it’s still light and simple to use. It also includes a lock-on switch, allowing you to move the workpiece and hold the shear in a more comfortable position.
.fusion-content-boxes-4 .fusion-content-box-hover .heading-link:hover .icon i.circle-yes,
.fusion-content-boxes-4 .fusion-content-box-hover .link-area-box:hover .heading-link .icon i.circle-yes,
.fusion-content-boxes-4 .fusion-content-box-hover .link-area-link-icon-hover .heading .icon i.circle-yes,
.fusion-content-boxes-4 .fusion-content-box-hover .link-area-box-hover .heading .icon i.circle-yes {
background-color: #65bc7b !important;
border-color: #65bc7b !important;>

5. Gino Development 01-0101 TruePower Electric Sheet Metal Shear
.fusion-content-boxes-5 .heading .content-box-heading {color:#cfcfcf;}
.fusion-content-boxes-5 .fusion-content-box-hover .link-area-link-icon-hover .heading .content-box-heading,
.fusion-content-boxes-5 .fusion-content-box-hover .link-area-link-icon-hover .heading .heading-link .content-box-heading,
.fusion-content-boxes-5 .fusion-content-box-hover .link-area-box-hover .heading .content-box-heading,
.fusion-content-boxes-5 .fusion-content-box-hover .link-area-box-hover .heading .heading-link .content-box-heading,
.fusion-content-boxes-5 .fusion-content-box-hover .link-area-link-icon-hover.link-area-box .fusion-read-more,
.fusion-content-boxes-5 .fusion-content-box-hover .link-area-link-icon-hover.link-area-box .fusion-read-more::after,
.fusion-content-boxes-5 .fusion-content-box-hover .link-area-link-icon-hover.link-area-box .fusion-read-more::before,
.fusion-content-boxes-5 .fusion-content-box-hover .fusion-read-more:hover:after,
.fusion-content-boxes-5 .fusion-content-box-hover .fusion-read-more:hover:before,
.fusion-content-boxes-5 .fusion-content-box-hover .fusion-read-more:hover,
.fusion-content-boxes-5 .fusion-content-box-hover .link-area-box-hover.link-area-box .fusion-read-more,
.fusion-content-boxes-5 .fusion-content-box-hover .link-area-box-hover.link-area-box .fusion-read-more::after,
.fusion-content-boxes-5 .fusion-content-box-hover .link-area-box-hover.link-area-box .fusion-read-more::before,
.fusion-content-boxes-5 .fusion-content-box-hover .link-area-link-icon-hover .icon .circle-no,
.fusion-content-boxes-5 .heading .heading-link:hover .content-box-heading {
color: #65bc7b;
}
.fusion-content-boxes-5 .fusion-content-box-hover .link-area-box-hover .icon .circle-no {
color: #65bc7b !important;
}.fusion-content-boxes-5 .fusion-content-box-hover .link-area-box.link-area-box-hover .fusion-content-box-button {background: #293f63;color: #ffffff;}.fusion-content-boxes-5 .fusion-content-box-hover .link-area-box.link-area-box-hover .fusion-content-box-button .fusion-button-text {color: #ffffff;}
.fusion-content-boxes-5 .fusion-content-box-hover .link-area-link-icon-hover .heading .icon > span {
background-color: #65bc7b !important;
}
.fusion-content-boxes-5 .fusion-content-box-hover .link-area-box-hover .heading .icon > span {
border-color: #65bc7b !important;>
Pros:
No waste with a single bladeWill cut curves as well as plastic
Cons:
The power supply is just 3.5 ampsSingle-speedThe workpiece is distorted by a single blade
Sebring Tip:
The Gino Development 01-0101 TruePower Electric Sheet Metal Cutter has just one blade. This implies the Gino will cut through metal without producing waste, but the metal will bend and deform as the blade passes through it.
As a result, if you’re going to deal with the leftover metal and need it to stay flat, these shears aren’t the greatest option. A single blade shear is able to cut corners, but since it has a large turning circle, don’t anticipate sharp edges.
.fusion-content-boxes-5 .fusion-content-box-hover .heading-link:hover .icon i.circle-yes,
.fusion-content-boxes-5 .fusion-content-box-hover .link-area-box:hover .heading-link .icon i.circle-yes,
.fusion-content-boxes-5 .fusion-content-box-hover .link-area-link-icon-hover .heading .icon i.circle-yes,
.fusion-content-boxes-5 .fusion-content-box-hover .link-area-box-hover .heading .icon i.circle-yes {
background-color: #65bc7b !important;
border-color: #65bc7b !important;>

6. Wild Edge SEMS5A Electric Metal Shear
.fusion-content-boxes-6 .heading .content-box-heading {color:#cfcfcf;}
.fusion-content-boxes-6 .fusion-content-box-hover .link-area-link-icon-hover .heading .content-box-heading,
.fusion-content-boxes-6 .fusion-content-box-hover .link-area-link-icon-hover .heading .heading-link .content-box-heading,
.fusion-content-boxes-6 .fusion-content-box-hover .link-area-box-hover .heading .content-box-heading,
.fusion-content-boxes-6 .fusion-content-box-hover .link-area-box-hover .heading .heading-link .content-box-heading,
.fusion-content-boxes-6 .fusion-content-box-hover .link-area-link-icon-hover.link-area-box .fusion-read-more,
.fusion-content-boxes-6 .fusion-content-box-hover .link-area-link-icon-hover.link-area-box .fusion-read-more::after,
.fusion-content-boxes-6 .fusion-content-box-hover .link-area-link-icon-hover.link-area-box .fusion-read-more::before,
.fusion-content-boxes-6 .fusion-content-box-hover .fusion-read-more:hover:after,
.fusion-content-boxes-6 .fusion-content-box-hover .fusion-read-more:hover:before,
.fusion-content-boxes-6 .fusion-content-box-hover .fusion-read-more:hover,
.fusion-content-boxes-6 .fusion-content-box-hover .link-area-box-hover.link-area-box .fusion-read-more,
.fusion-content-boxes-6 .fusion-content-box-hover .link-area-box-hover.link-area-box .fusion-read-more::after,
.fusion-content-boxes-6 .fusion-content-box-hover .link-area-box-hover.link-area-box .fusion-read-more::before,
.fusion-content-boxes-6 .fusion-content-box-hover .link-area-link-icon-hover .icon .circle-no,
.fusion-content-boxes-6 .heading .heading-link:hover .content-box-heading {
color: #65bc7b;
}
.fusion-content-boxes-6 .fusion-content-box-hover .link-area-box-hover .icon .circle-no {
color: #65bc7b !important;
}.fusion-content-boxes-6 .fusion-content-box-hover .link-area-box.link-area-box-hover .fusion-content-box-button {background: #293f63;color: #ffffff;}.fusion-content-boxes-6 .fusion-content-box-hover .link-area-box.link-area-box-hover .fusion-content-box-button .fusion-button-text {color: #ffffff;}
.fusion-content-boxes-6 .fusion-content-box-hover .link-area-link-icon-hover .heading .icon > span {
background-color: #65bc7b !important;
}
.fusion-content-boxes-6 .fusion-content-box-hover .link-area-box-hover .heading .icon > span {
border-color: #65bc7b !important;>
Pros:
5-amp motor at a low cost2,700 spm
Cons:
Straight lines are better
Sebring Tip:
You can get the Wild Edge SEMS5A Electric Metal Shear for about the same price as the Genesis. It features a more powerful 5-amp motor that can achieve a cutting speed of 2,700 spm, but this won’t make a significant difference while cutting. It can cut 15-gauge stainless steel and 14-gauge sheet metal, and it features a 360-degree swiveling head to enable for some movement & curve in your cut.
.fusion-content-boxes-6 .fusion-content-box-hover .heading-link:hover .icon i.circle-yes,
.fusion-content-boxes-6 .fusion-content-box-hover .link-area-box:hover .heading-link .icon i.circle-yes,
.fusion-content-boxes-6 .fusion-content-box-hover .link-area-link-icon-hover .heading .icon i.circle-yes,
.fusion-content-boxes-6 .fusion-content-box-hover .link-area-box-hover .heading .icon i.circle-yes {
background-color: #65bc7b !important;
border-color: #65bc7b !important;>

7. Makita JS1602 16 Gauge Shear
.fusion-content-boxes-7 .heading .content-box-heading {color:#cfcfcf;}
.fusion-content-boxes-7 .fusion-content-box-hover .link-area-link-icon-hover .heading .content-box-heading,
.fusion-content-boxes-7 .fusion-content-box-hover .link-area-link-icon-hover .heading .heading-link .content-box-heading,
.fusion-content-boxes-7 .fusion-content-box-hover .link-area-box-hover .heading .content-box-heading,
.fusion-content-boxes-7 .fusion-content-box-hover .link-area-box-hover .heading .heading-link .content-box-heading,
.fusion-content-boxes-7 .fusion-content-box-hover .link-area-link-icon-hover.link-area-box .fusion-read-more,
.fusion-content-boxes-7 .fusion-content-box-hover .link-area-link-icon-hover.link-area-box .fusion-read-more::after,
.fusion-content-boxes-7 .fusion-content-box-hover .link-area-link-icon-hover.link-area-box .fusion-read-more::before,
.fusion-content-boxes-7 .fusion-content-box-hover .fusion-read-more:hover:after,
.fusion-content-boxes-7 .fusion-content-box-hover .fusion-read-more:hover:before,
.fusion-content-boxes-7 .fusion-content-box-hover .fusion-read-more:hover,
.fusion-content-boxes-7 .fusion-content-box-hover .link-area-box-hover.link-area-box .fusion-read-more,
.fusion-content-boxes-7 .fusion-content-box-hover .link-area-box-hover.link-area-box .fusion-read-more::after,
.fusion-content-boxes-7 .fusion-content-box-hover .link-area-box-hover.link-area-box .fusion-read-more::before,
.fusion-content-boxes-7 .fusion-content-box-hover .link-area-link-icon-hover .icon .circle-no,
.fusion-content-boxes-7 .heading .heading-link:hover .content-box-heading {
color: #65bc7b;
}
.fusion-content-boxes-7 .fusion-content-box-hover .link-area-box-hover .icon .circle-no {
color: #65bc7b !important;
}.fusion-content-boxes-7 .fusion-content-box-hover .link-area-box.link-area-box-hover .fusion-content-box-button {background: #293f63;color: #ffffff;}.fusion-content-boxes-7 .fusion-content-box-hover .link-area-box.link-area-box-hover .fusion-content-box-button .fusion-button-text {color: #ffffff;}
.fusion-content-boxes-7 .fusion-content-box-hover .link-area-link-icon-hover .heading .icon > span {
background-color: #65bc7b !important;
}
.fusion-content-boxes-7 .fusion-content-box-hover .link-area-box-hover .heading .icon > span {
border-color: #65bc7b !important;>
Pros:
Can cut shapes and curvesComfortable and lightweight
Cons:
The 4-amp motor isn’t as powerful as it should beNo variable speed
Sebring Tip:
The Makita JS1602 12 Gauge Shear is a single-blade model with a high price tag. It features a 3.4-amp motor with a single cutting speed of 4,000 spm and low power consumption. When you first turn it on, it would seem too strong, and even when fully functioning, it will feel too powerful.
The Makita, on the other hand, is light and pleasant to operate, so it cuts sheet and stainless steel up to 16 gauge with little user fatigue. Because this is a single-blade cutting model, there is no waste, but one-half of the cut material will be distorted and possibly unusable.
.fusion-content-boxes-7 .fusion-content-box-hover .heading-link:hover .icon i.circle-yes,
.fusion-content-boxes-7 .fusion-content-box-hover .link-area-box:hover .heading-link .icon i.circle-yes,
.fusion-content-boxes-7 .fusion-content-box-hover .link-area-link-icon-hover .heading .icon i.circle-yes,
.fusion-content-boxes-7 .fusion-content-box-hover .link-area-box-hover .heading .icon i.circle-yes {
background-color: #65bc7b !important;
border-color: #65bc7b !important;>
The Best Metal Shears Buying Guide
You’re probably familiar with a metal shear if you deal with sheet metal or metal components in general. With this tool, you can swiftly cut through metal components without exerting too much effort. Working with sheet metal becomes very difficult, if not impossible, without this equipment.
If you want to be productive in the workshop, you need to choose the finest electric metal shear. However, if you aren’t well-versed in the subject, finding the appropriate product may be difficult. That’s where we can help.
As previously said, we have included some of the finest metal cutting shears in this post. You will differentiate them easily now that we’ve discussed their main features and choices. You should have a good understanding of metal shears in general after this.
However, if you want to learn more about metal shears, we’ve put up a comprehensive purchasing guide especially for you. This buying guide covers a wide variety of metal shears-related topics and considerations. In other words, if you read this buying guide all the way to the conclusion, you’ll be able to choose the ideal metal scissors for you:
Type of Tool
Metal shears come in various sizes and shapes since they are so helpful for cutting metal sheets and items. As a result, the different models available vary in terms of capability. Various metal shears are suitable for distinct purposes, in addition to having other characteristics.
Some are stand-alone power tools with built-in electric motors, while others are accessories for your current power tools. You may choose one of them based on your needs for simplicity of use and power.
Type of Power
If you choose freestanding power shears with an integrated electric motor, you may choose from various power types. Even though all powered metal shears are powered by electricity, the energy source varies depending on the model.
Some are corded versions that connect directly into a power outlet, while others are cordless and run on battery power. Corded versions are usually more powerful, while cordless ones are more convenient for portable use.
Power Rating
Whether you’re purchasing a corded or cordless power tool, it’s critical to be sure it’s strong enough. If you wish to cut thick metal sheets, this is particularly true for metal shears. As a result, the power rating for the majority of metal shears models may be found.
This power rating is expressed in amps for corded versions and is either four amps or five amps. Cordless metal shears, on the other hand, have a power rating of 12 or 20 volts. In each of these instances, the greater the rating, the better the performance.
Rating of the Gauge
Checking the gauge rating of your metal shears is another method to get a sense of their performance. This informs you what metal sheet thicknesses are supported or compatible with the metal shears you’re using. Some metal shears have a 14-gauge gauge rating, whereas others have a 20-gauge gauge rating.
When comparing the two gauge ratings, the 14-gauge grade is superior for cutting thick metal sheets. In other words, thinner metal sheets come from a higher gauge rating, whereas thinner metal sheets result from a lower gauge value.
Warranty
Any particular metal shears model’s guarantee length is just as essential as any other element or detail discussed in our purchasing guide. This is because if you want to use your metal shears for a long time, you should get metal shears with a lengthy guarantee period.
Almost every metal shear on the market comes with a two-year guarantee. However, in certain instances, you may get somewhat better versions with a 5-year warranty.
What To Look For When Buying the Best Metal Shears
Metal shears aren’t designed for a single task. Nonetheless, depending on the speed controls, their performance and function change.
The blade material: Make sure you get a metal shear with a sturdy blade that can withstand the materials you’ll be cutting. This will save you money by keeping you from having to replace the blade frequently. Furthermore, a metal shear with a powerful blade will allow you to cut quickly and smoothly without becoming fatigued.
The metal shear’s speed controls are the next item you should think about. It is suggested that you use a high-speed shear to avoid any unnecessary slowdowns while operating. High-speed shears improve cutting and finishing by increasing stroke speed.
Safety: If the tool you’re using doesn’t have the appropriate safeguards and safety features, shearing may cause damage or injury. Look for warning labels or point-of-operation guards on the metal shear you’re going to buy to keep you safe when shearing. To increase your safety even further, it’s a good idea to get some instruction before using the machine, particularly if it’s your first time.
Conclusion:
During our testing, we discovered that the DeWalt DW890 Metal Shear is reasonably priced, powerful, and has all of the features you need from a tool of this kind. If you’re on a budget and require a set of shears with variable power settings and a high power output, the WEN 3650 Electric Metal Cutter Shear is a great choice.
The DeWalt metal shear would be ideal for basic shearing at home. It has a strong 5.0 Amp motor with a ball bearing for added longevity. This metal shear then cuts a 7/32 inch strip that bends out from the cutting region, giving you a clean line of sight. This product is very long-lasting and simple to use. It can cut a radius of up to 5-1/2 inches, and its head swivels 360 degrees for easy cutting.
Because this device is lightweight (weighing just 5.0 lbs), you may use it for longer periods with less hand fatigue. It can cut through 20-gauge stainless steel and 18-gauge mild steel, among other materials. Its variable speed dial allows you to adjust the speed for different applications and materials.
To view our Amazon Associates Disclaimer, please click here.
The post 7 Best Sheet Metal Shears [2021 Reviews] appeared first on Luxury Home Remodeling | Sebring Design Build.
Did you miss our previous article…
https://www.amazingsidingstl.com/?p=494


 The siding on your home represents the roof and any number of things you may want to protect from the elements. Perhaps you have lived in a region where the weather never seems to cooperate, or perhaps you live in a part of the world that has historically seen harsh winters. Whatever the reason, you’ve probably considered having some siding done to protect the things around your house. Vinyl siding is one trendy solution to this problem.